Release point and the Pitcher’s Arc
October 29, 2013 by Coach McCreary
Filed under Pitching
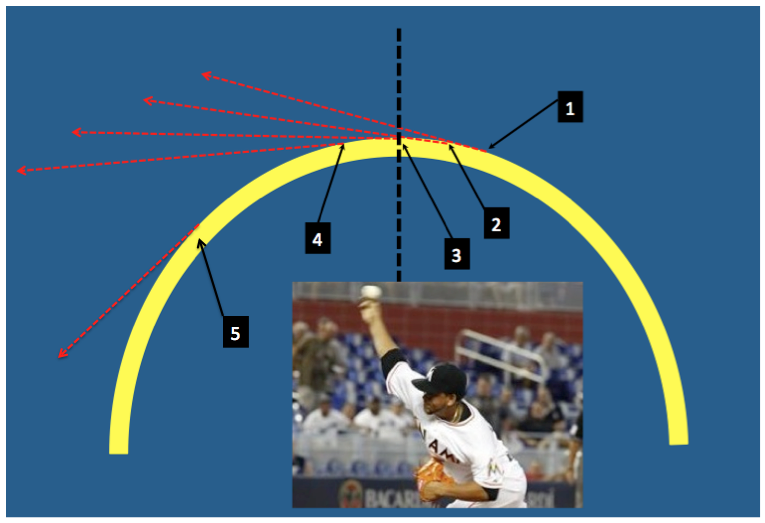
When a pitcher throws a ball overhand, a basic arc is created with the ball. The arc looks something like the yellow one shown in the diagram I created.
Labeled on the graphic are five release points and five corresponding trajectories (red arrows) showing where the ball will go if it is let go at that particular release point. The black dashed line represents the very top of the arc. Like the photo I added of the Marlins pitcher shows, the home plate area would be to the left of the graphic.
When I’ve worked with pitchers, at some point I usually refer to this arc to explain to the player the concept of release point and how important it is to get it right. I also point out that by looking at the graphic, they do not have a lot of room for error. A one inch difference in release point can mean the difference between a good fastball at the knees and a belt high fat one for the hitter. A lot of pitchers can repeat their body’s delivery but few can repeat their exact release point over and over.
Below are several things I say to pitchers with regards to the pitcher’s arc. Of course, which ones I emphasize depends on the specific needs of the pitcher.
- The goal for pitchers is to always try to release the ball on the downside of the arc – to the left of the black dashed mid-point line. You can see by the arrows what happens when a pitcher lets go too soon. The ball is projected upward because at the time of the release, the hand was still on its way up.
- Pitchers who struggle with getting their breaking pitches down in the zone often let go of the ball at the high-point of the arc or slightly behind it. On the graphic this would correspond to the area between release points #1 and #3. The common reason for this is that their mind/body “thinks” breaking pitch too soon and they start to hook or rotate their hand to create the breaking pitch spin too early. They release the pitch before the high point of the arc and the ball travels up and then curves down. In essence, they’ve hung their breaking pitch. You tend to see this more with curveballs than sliders.
- The breaking pitch problem explained in the previous bullet also is a common problem with change-ups. Many pitchers mistakenly slow down their arms on a change-up because their mind/body “thinks” change-up (a slower pitch) and react by slowing down the arm. When this occurs, the ball is often released a bit too soon which hangs the change-up up in the zone as well. This poor change-up release point usually corresponds to the area between numbers #2 and #3 on the graphic.
- The goal for pitchers is to release the ball somewhere between #3 and #4. When this occurs, the ball will leave the hand and procede on a slightly downward path to the plate. If done, breaking pitches usually have sharper breaks and fastballs and change-ups tend to be lower in the zone. The tough part for pitchers is that each of their different pitches may have a slightly different release point on the arc. Getting the body to remember where that exact point is is a constant battle for every pitcher. In-game, real-time adjustments often involve the pitcher trying to get back to the needed release point for the pitch that may not be working.
- Young players (mostly high school and below) struggle with this more because they almost always play other positions besides pitcher. Position players do not have the same release point as pitchers because they don’t want their throws to procede downward. They have longer throws to make so they often want the ball to go slightly upward after the release so the ball can travel farther. Their release points would be more in the #1 to #3 range depending on how far they need to throw. When these position players have to step on the mound, their arms and bodies are used to releasing the ball bewteen #1 and #3. As a pitcher, they need to be between #3 and #4. Too often, they are not able to make this adjustment immediately upon stepping to the mound. It can be a struggle to keep the ball down in the zone for this kind of kid. Some adjust after a while but by the time the adjustment is made, unfortunately, the damage may already be done.
- When pitchers are wild up in the zone, my usual go-to lines are “get out front” or “reach out.” What I am trying to do is get the pitcher to hold onto the ball slightly longer so their release point is more in the #3 to #4 range. With chronic wild-high pitchers, I will even go as far as to say “release it in front of your face.” In reality, if a pitcher would literally do that, they would release the ball at #5. The result would be a pitch thrown about 10 feet straight to the ground. This is where the power of exaggeration can help. The pitcher “thinks” #5 but in reality, he is more likely to end up in the #3 to #4 range which was the goal in the first place.
Telling pitchers about the pitcher’s arc can be a big help. However, showing them the arc above as well can help those of us who are more visual learners.
Tomorrow’s (video) post: Shortstop footwork on pickoffs to second base


Leave a Reply